Add value to your recipe website by adding “Email Me the Recipe” to your recipe card using WPForms and WP Recipe Maker. If you are a food blogger, you might have noticed that some sites, like The Good Plate, allow you to email recipes to visitors.
Why should you do this? Do it to add value to your website and your recipes. Adding an “email me the recipe” option to your food blog can be beneficial for several reasons:
- Convenience: Many visitors to your blog may want to save or print out recipes for future reference. Offering an option to email the recipe directly provides a convenient way for them to access it later.
- Accessibility: Not all visitors may have access to a printer or may not want to print out the recipe immediately. Allowing them to email the recipe makes it accessible for them to retrieve later on any device with internet access.
- Personalization: Providing an option to email the recipe allows you to engage with your audience on a more personal level. You can include a personalized message in the email, invite them to subscribe to your newsletter, or even offer additional tips or variations on the recipe.
- Increasing engagement and return visits: By offering extra value through the email option, you encourage visitors to spend more time on your site, increasing engagement. Additionally, when they receive the recipe in their inbox, it serves as a reminder of your blog, prompting them to return for more recipes in the future.
Is This Easy?
These instructions are not very easy. Take your time and read them thoroughly. Implementing everything could take several hours to a few days. However, when you are finished, you will have both given your visitors a reason to come back to your site and the ability to give them more information in the future personally. If this seems too difficult, please contact us if you still want the feature on your website.
The most popular and best recipe plugin for WordPress is, without a doubt, WP Recipe Maker by Brecht and Birthe Vandermeeren of Bootstrapped Ventures. If you are using another plugin and your site isn’t performing as well as it could, I highly recommend installing WPRM and importing from various other plugins.
That said, I want to discuss how to insert an email-me-the-recipe field into the recipe card.
You may have seen Email Me the Recipe as a popup. Many users don’t like popups. Sometimes, when confronted with a popup, the user will close the tab, hit the back button, and go to another site to find the recipe they want. You want to keep visitors on your site, not drive them away. This is especially true if you have advertising running on your site.
So the answer is to add the Email Me the Recipe to the recipe card itself.
Required Plugins
Here’s a quick list of the plugins you need to do this:
- WP Recipe Maker
- WP Forms
- WP Code (optional)
- MailerLite (optional)
These are all free plugins, but I recommend upgrading WP Recipe Maker and WP Forms. Upgrading WP Recipe Maker lets you include equipment links, and upgrading WP Forms keeps the visitor’s form information on your site and sends you an email. To register the recipe snippet in WP Code, you must upgrade to WP Code Pro.
MailerLite is a mailer that knocks the socks off MailChimp. Upgrading WP Forms will automatically add the user as a subscriber to your MailerLite. If your mailer is not listed with WP Forms, you could use Zapier or manually copy and paste the visitor’s information.
Code Snippets
WP Forms uses “smart tags”. In this case, the smart tag grabs the recipe from WP Recipe Maker and puts it in the email that WP Forms sends back to the visitor. But first, the smart tag {recipe} has to be generated.
Register the {recipe} smart tag
Insert the code in your functions.php file. I highly recommend doing this with a child theme so your work is not erased when you upgrade your theme. I recommend Catch’s Generate Child Theme. Also recommended, via FTP, make a copy of your existing functions.php file in case of an error.
/**
 * Register the Smart Tag so it will be available to select in the form builder.
 *
 */
add_filter( 'wpforms_smart_tags', 'oc_register_smarttag', 10, 1 );
function oc_register_smarttag( $tags ) {

    $tags[ 'recipe' ] = 'Recipe';

    return $tags;

}

/**
 * Process the Smart Tag.
 */
add_filter( 'wpforms_smart_tag_process', 'oc_process_smarttag', 10, 2 );
function oc_process_smarttag( $content, $tag ) {

    if ( 'recipe' === $tag ) {

		$post_id = get_the_ID();

        $link    = do_shortcode( '' ) . '<br>' . do_shortcode( '' ) . do_shortcode( '' );

        $content = str_replace( '{recipe}', $link, $content );

    }

    return $content;

}
Disable Modern Markup
You need to add one more snippet to functions.php, which keeps the WPForms form from breaking in WP Recipe Maker.
//So WPForms will not use modern markup as it breaks WP Recipe Maker Email the Recipe
add_filter( 'wpforms_admin_settings_modern_markup_register_field_is_hidden', '__return_false' );
WPForms
Change the Settings
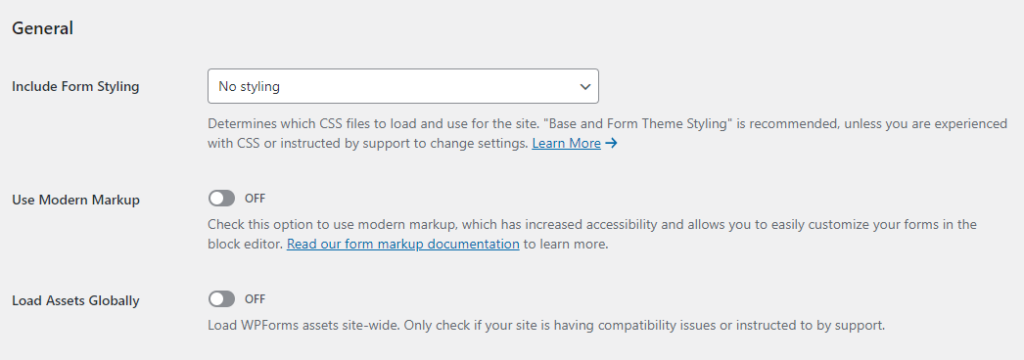
Now that you added the filter for WPForm, you need to change the settings for WPForms.
- WPForms -> Settings
- Include Form Styling -> No Styling
- Use Modern Markup -> OFF
- Load Assets Globally -> OFF
Make the form
First, make a form. You can add as many fields as you want. However, I suggest only name and email because people tend to abandon forms with too many fields.
- WPForms -> Add New
- Choose a form type. The Blank form is fine.
- From the field list, drag Single Line Text and Email
- Click on Single Line Text to edit it. Name the field Name.
- Make the field, now called Name, required.
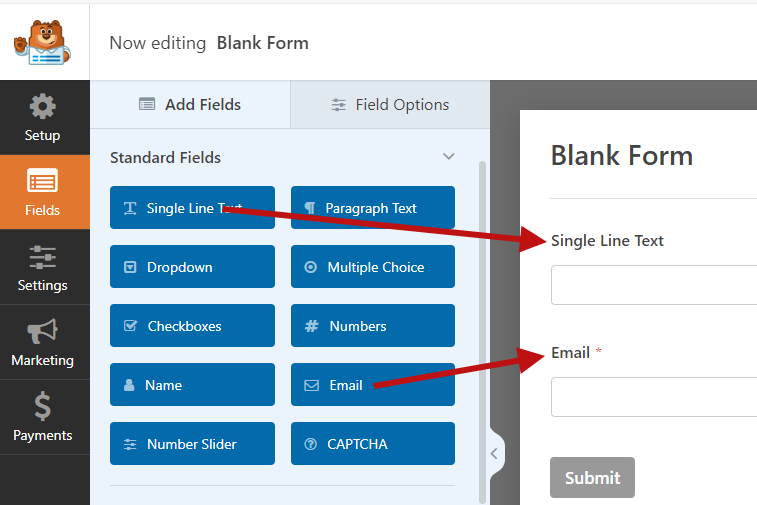
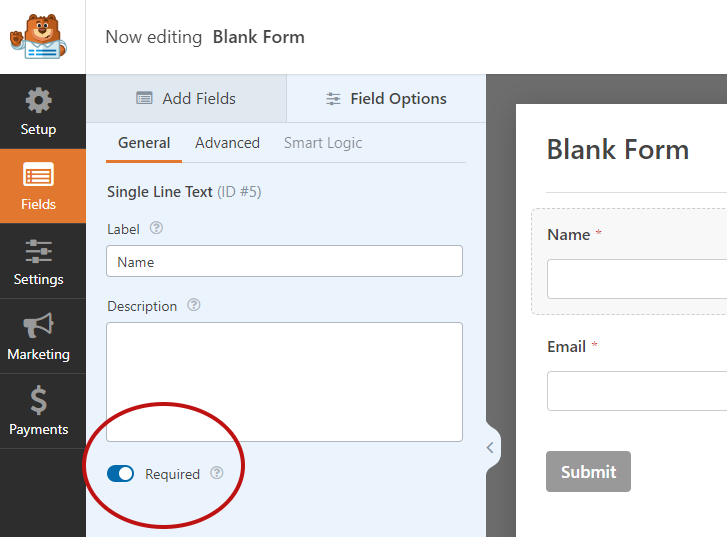
Here is mine in WPForms.
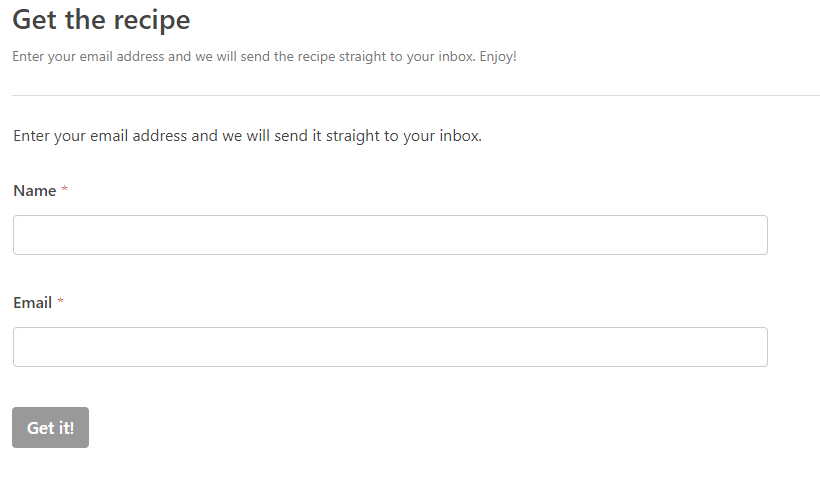
Notice that “Enter your email address, and we will send the recipe straight to your inbox” is twice present. This is because the first one is the description of the form and does not appear in how we will insert it into WPRM.
Set up the Email Going to the Visitor
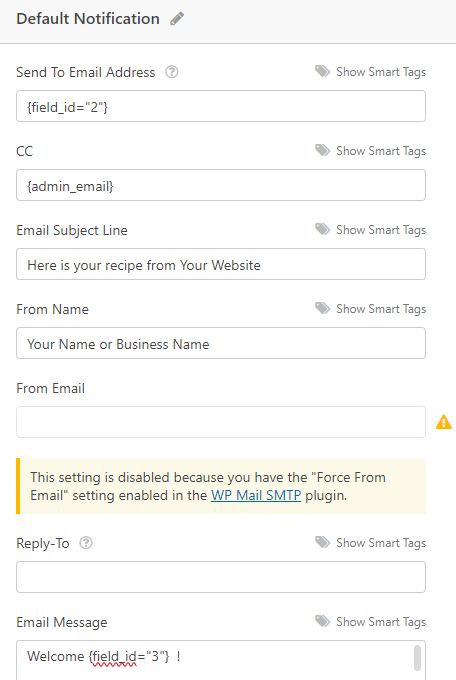
Before you save the form, go to Settings -> Notifications and set up the default notification. This is the email that will go out. You can change the verbiage to anything you want.
I highly recommend using WP Mail SMTP instead of relying on your hosting server. With incoming email servers increasingly likely to reject improperly verified emails, using an SMTP plugin is important. WP MAIL STMP happens to be from the same people as WP Forms, so they work hand in hand.
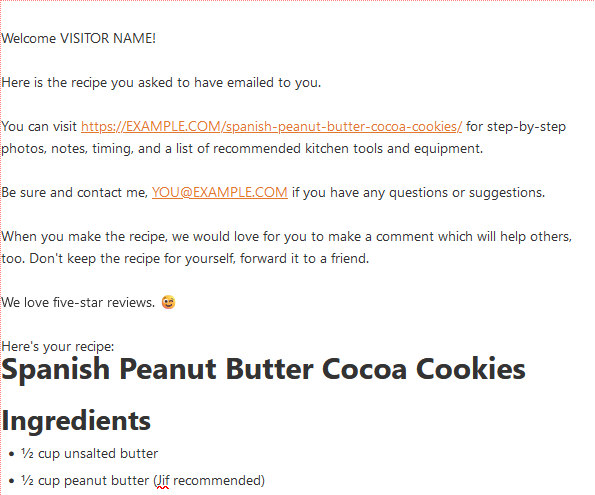
This is what I have in mine. The different smart fields are field 3, the person’s name, and field 2, their email. The {recipe} field which you already configured earlier, also goes in here near the bottom.
Welcome {field_id="3"}  !

Here is the recipe you asked to have emailed to you.

You can visit {page_url} for step-by-step photos, notes, timing, and a list of recommended kitchen tools and equipment.

Be sure and contact me, {admin_email} if you have any questions or suggestions.

When you make the recipe, we would love for you to make a comment which will help others, too.  Don't keep the recipe for yourself, forward it to a friend.

We love five-star reviews. 😉

Here's your recipe:
{recipe}
Get the Embed Code
Now that you have done that, you still need to get the embed code for WP Recipe Maker.
- Save the form
- Click on Embed
- Choose Use a Shortcode. Copy the shortcode. You will only need the id number.
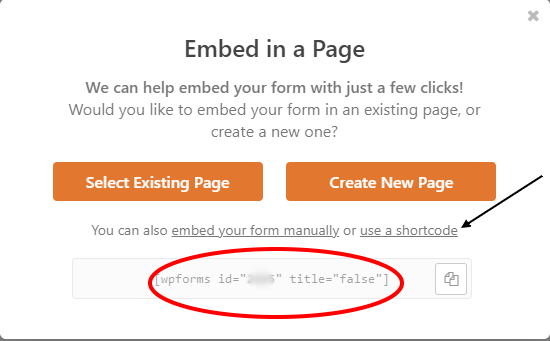
That’s it for WP Forms. Now the you have the embed code, you can use it in WP Recipe Maker.
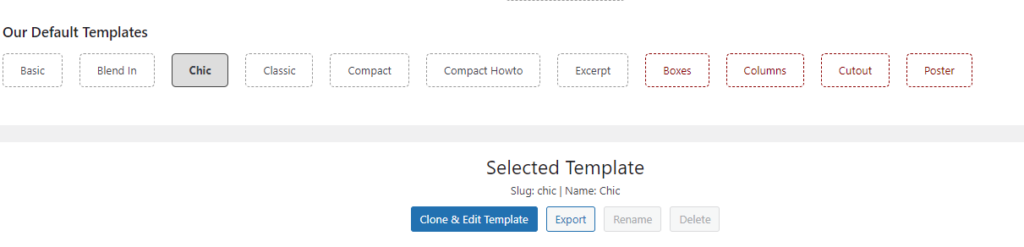
WP Recipe Maker
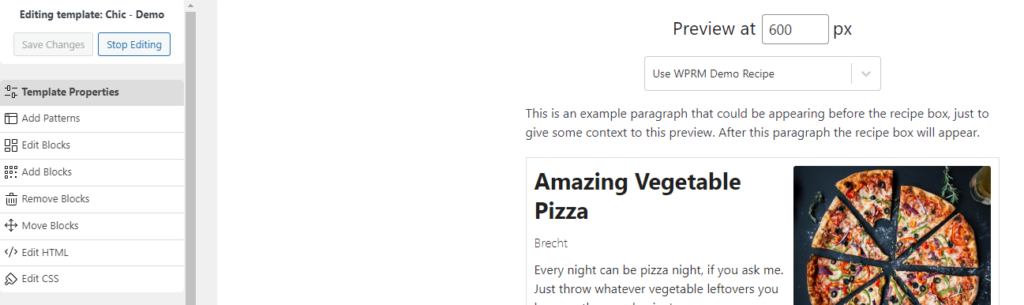
If you have not already chosen a WPRM template for your recipes, do so now. The Chic template is quite popular, but I like the Poster template. For this demonstration, we will be using the Chic template.

Clone Your Recipe Template
Click the template you want, then click Clone & Edit Template.
When prompted, enter a name for your template. I’m calling this one Chic—Demo. The following screen will appear.
Click on </> Edit HTML. This is where you will put the embed code you copied from WPForms.
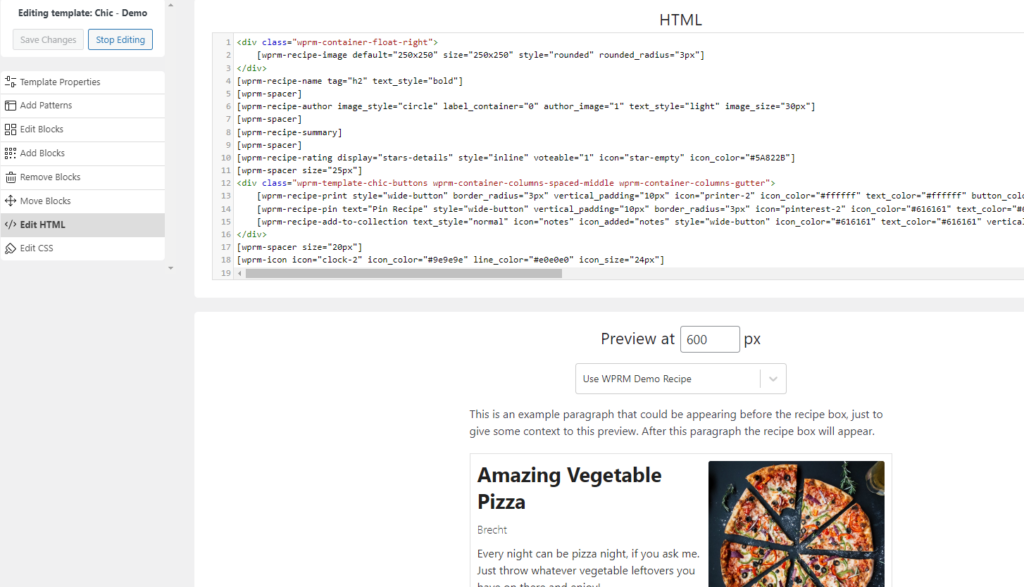
Put the code just before the first line, <div class=”wprm-container-float-right”>. When you copied the embed from WPForms, it might have included “title=false.” If it did, remove that.
WP Recipe Maker HTML Template Editor
Feel free to change this to whatever your brand colors are.
<div style="padding:1em; margin-top:0em;border-bottom:1px solid #c0c0c0; background-color:#f2f0df">
<h3 style="text-align:center; font-size:1.25em;margin-bottom:.5em;">Email Me the Recipe</h3>
</div> 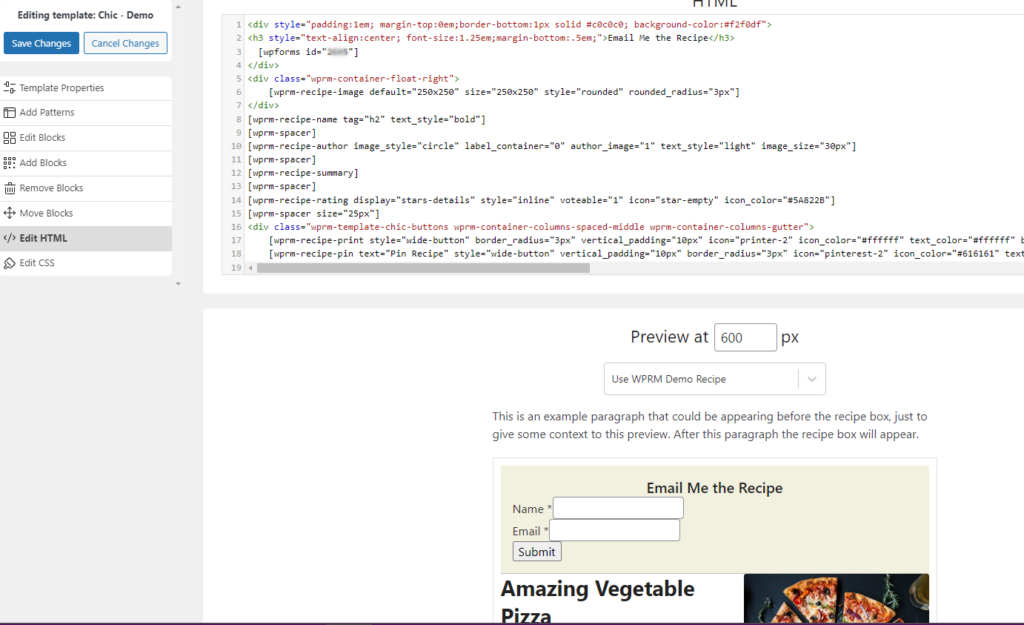
When you are happy with how the form looks, click on Save Changes and answer Yes when prompted. Then click on Stop Editing and your template will be saved.
You are free to edit the template in any way you wish to make it yours! Check out my other posts on that very subject!
You’re Done!
That’s it. Now, your recipes will have the Email Me the Recipe form. Using WPForms, you will also receive a copy of what the visitor requested, which may look something like this.
MailerLite
Would you like to be able to send visitors other information who showed interest in that recipe or recipe category?
Adding two more fields to your mailer’s email list is a good idea: recipe name and category. Do this so you can target these people in the future. The form will not enter this; it has to be done manually, but it doesn’t take much time.
You have to make a few changes to your mailer.
Enter New Fields
These instructions are for MailerLite. Your mailer may be different.
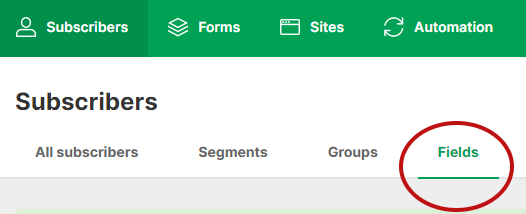
- Subscribers -> Fields
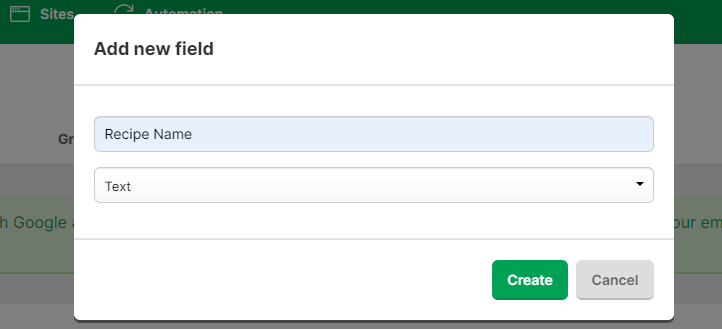
- Add New Field
- Name the field Recipe Name and choose Text as it’s a text field
- When you scroll down to the bottom of the list of fields, your new field will be there. Now, add the Recipe Category field the same way.
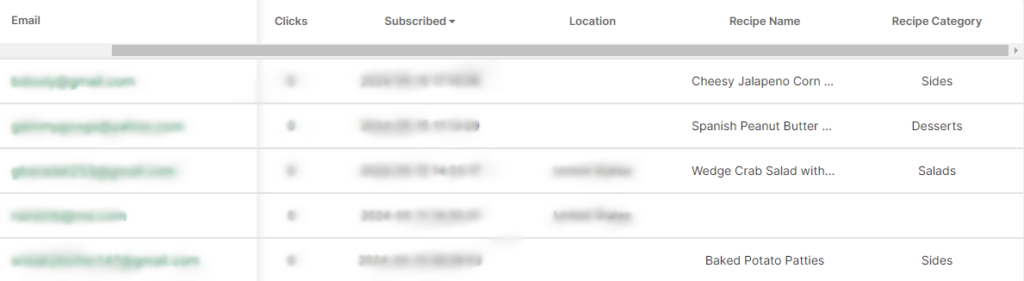
Looking at your list of subscribers, you can see what the recipe they requested and the category. Yes, this information has to be entered manually.
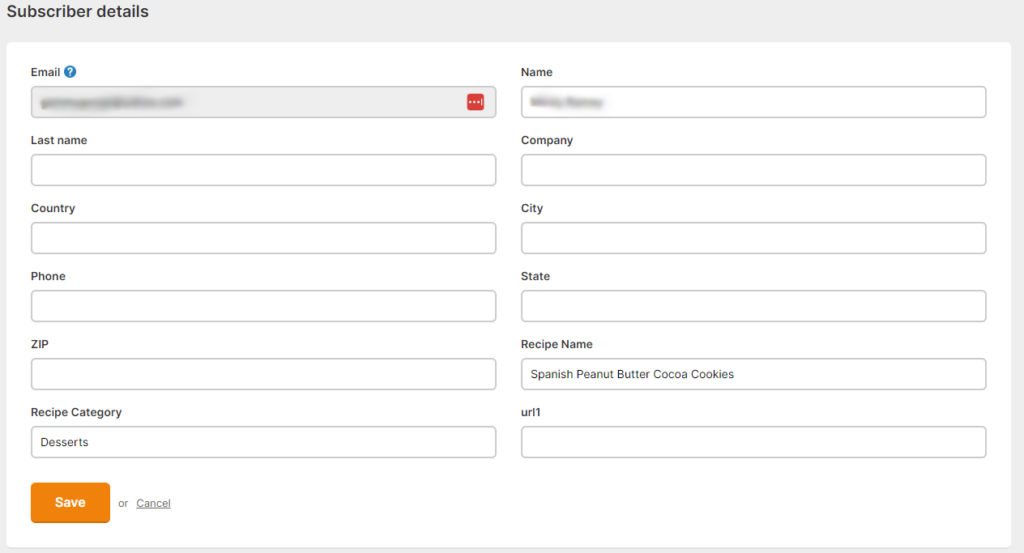
Edit a Subscriber
- Subscribers
- Click on the subscriber
- Subscriber Details -> Edit
- Enter the Recipe Name and Category
- Click Save
If your mailer is integrated with WPForms, the visitor who requested the recipe can be automatically added to your mailing list. Otherwise, when you receive a copy of the email from WPForms, enter it yourself. You can also add the Recipe Name and Recipe Category information while you are there.
Target Your Visitors
Now, you can target people who asked for certain recipes or categories when you send a special email or newsletter. It’s a good thing!

Notice the {$recipe_name} field. That is a merge tag that you can use when you write, maybe something like: “You liked the recipe for {$recipe_name}, we thought you might like this, too.”
Well, that’s it for this lesson. I hope you will put it on your recipe card soon. Remember, if you run into problems, you can always contact me, or I can do it for you for a small fee.